How To Install Over a Sub-Floor
Read all instructions before starting your project.
Preparing Your Subfloors
Before installing new hardwood flooring the subfloor should be clean, smooth, level, and structurally sound.
Prior To Installation
Prior to installing your new hardwood floor you must remove and stack the flooring in the room in which it will be installed. Allow the flooring to acclimate for several days; this will give the wood time to adjust to your home’s humidity level.
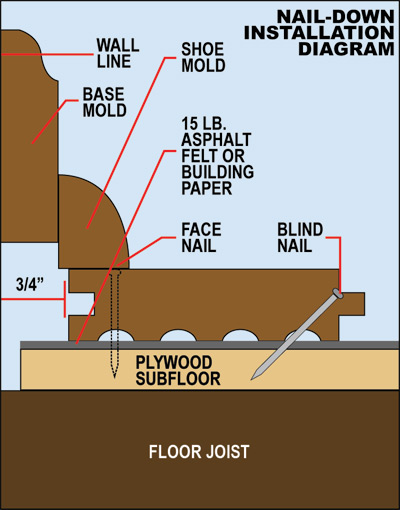
Cover the subfloor with a layer of 15-pound asphalt felt or Red Rosin paper to provide a moisture barrier and minimize squeaks. Mark the centerline of the room (as discussed in step 1).
If the room is out of square, position the tongue of the first row parallel to the centerline and rip the groove side at an angle parallel to the wall.
Use a radial arm saw or chop saw to cut the boards to length. When blind-nailing with a hammer and finishing nails, do not drive the nails flush with the hammer as this will leave indentations. Instead, leave each nail head projecting up about 1/8 inch, then use a nail set to finish driving the nail so that the nail head is flush with the wood.
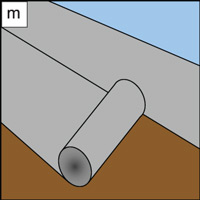
1. Cover the subfloor with a layer of 15-pound asphalt felt, or Red Rosin Paper, overlapping seams by about 3 inches. (see fig. m) Tack down with a staple gun.
Measure the room’s width at two or more points to establish an accurate centerline, then snap a chalk line parallel to your starting wall.
2. To indicate the edge of the first row of flooring, snap another chalk line about 3/4 inch from the starting wall exactly parallel to your centerline. This 3/4 inch gap between the flooring and the wall will allow for expansion; the gap will be covered by the shoe molding or baseboard molding.
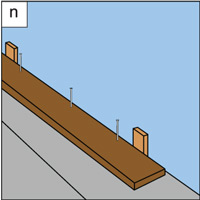
3. Choose the longest planks for the first row. Near the wall, where the nail heads will be covered by your shoe molding, drill pilot holes for 1 1/2 inch finishing nails. Then face-nail the first row through the plywood subflooring to the floor joists. Use a nail set to recess the nails below the surface. (see fig. n)
4. Blind-nail this and the next two rows by hand. Drill pilot holes at a 45-to-50-degree angle through the tongues, centered on each joist at every 10 inches along the lengths. Fasten with 1 1/2-inch finishing nails. Use a nail set to finish driving each nail.
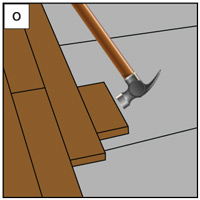
5. When installing the second row and every row thereafter, move a short scrap piece of flooring along the edge and give it a firm tap with a mallet or hammer to tighten the new row against the previous row before nailing. (see fig. o)
Remember that end joints in two adjacent rows should not be closer than 6 inches (15cm); end joints should also not line up over a joint in the subfloor.
6. If you’re installing flooring over a large area, use a flooring nailer once you’ve installed the first three rows. Set it onto the board’s tongue and, using a heavy rubber mallet, strike the plunger to drive 2-inch nails through the tongue into the sub-floor. Be very careful to avoid scratching or otherwise damaging the flooring surface when using a flooring nailer.
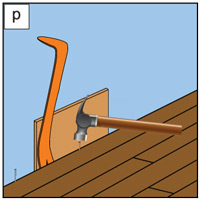
7. When you reach the final row, use a block and a pry bar to wedge the last boards tightly into position. Drill holes and face-nail boards where baseboard or base shoe molding will cover. Set the nail heads below the surface using a hammer and nail set. (see fig. p)
Final Inspection
After the floor is cleaned, reinspect the floor for nicks, scratches and planks that may have moved during installation or any other imperfections that need attention. In typical climates, floors can accept foot traffic within 8–12 hours. Arid climates may require more curing time.
Floor Protection During Construction
To protect the completed floor during construction, lay cloth painters tarps over the floor and tape them to the skirting boards. Never use plastic or polyethylene to cover the floor since they will trap moisture. Covering materials must allow the floor to breathe.